Prerequisites:
- I suggest you clone the git repo for DockerPortal to your local machine, this is where all the config files are stored for each lab:
git clone https://github.com/MrK8s/DockerPortal.git
- The files we will be using today are located in the DockerLab directory
Installing Docker:
Set up Docker’s apt repostitory
<h1>Add Docker's official GPG key:</h1> sudo apt-get update sudo apt-get install ca-certificates curl gnupg sudo install -m 0755 -d /etc/apt/keyrings curl -fsSL https://download.docker.com/linux/ubuntu/gpg | sudo gpg --dearmor -o /etc/apt/keyrings/docker.gpg sudo chmod a+r /etc/apt/keyrings/docker.gpg <h1>Add the repository to Apt sources:</h1> echo \ "deb [arch="$(dpkg --print-architecture)" signed-by=/etc/apt/keyrings/docker.gpg] https://download.docker.com/linux/ubuntu \ "$(. /etc/os-release &amp;&amp; echo "$VERSION_CODENAME")" stable" | \ sudo tee /etc/apt/sources.list.d/docker.list &gt; /dev/null sudo apt-get update
To install the latest version, run:
sudo apt-get install docker-ce docker-ce-cli containerd.io docker-buildx-plugin docker-compose-plugin
Verify the installation:
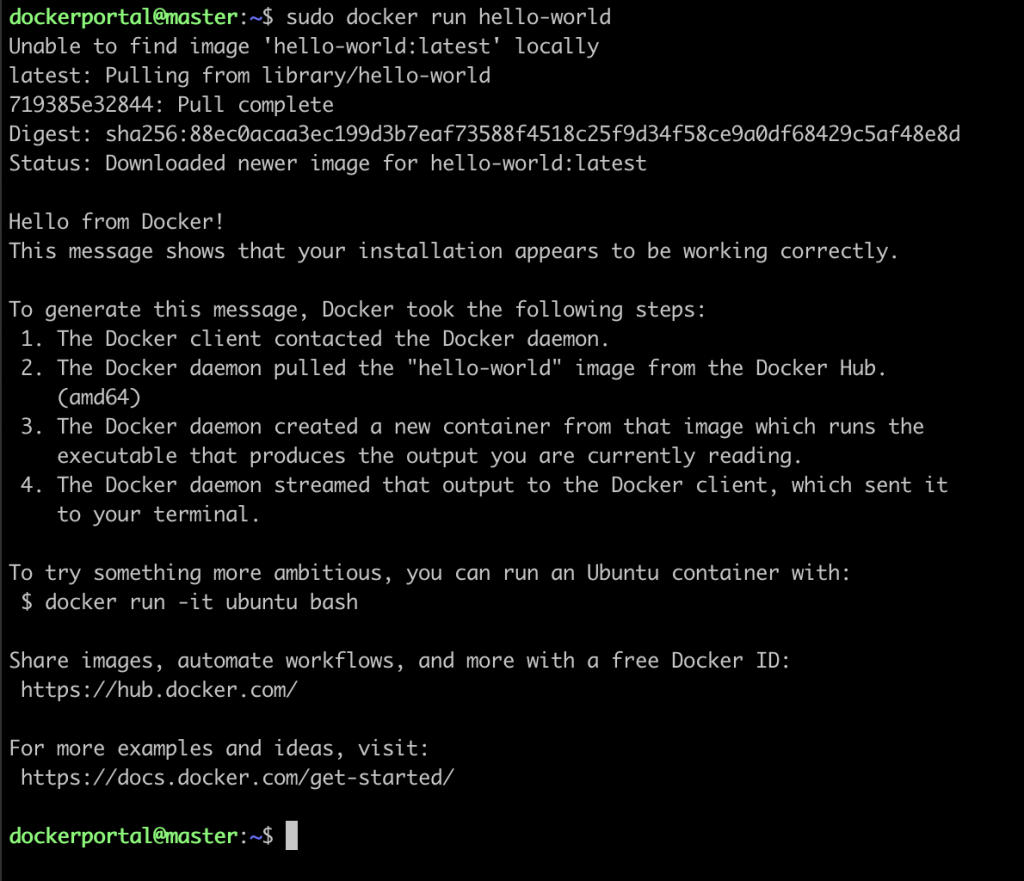
To verify the installation, lets run your first docker image:
sudo docker run hello-world
Expected output:

To display you current running containers use the command
docker ps
To display all you containers (including stopped ones) use the command
docker ps -a

Building and Running a Dockerized Application:
Step 1. Initial setup
First of all head in to the DockerLab directory:
cd labs/DockerLab
We are going to be Dockerizing a python web-server, if you want to check out the code it is located in app.py.
“Dockerizing” refers to the process of packaging, distributing, and managing applications within containers using Docker. Docker containers encapsulate an application, its environment, libraries, and dependencies, all in one package. This ensures that the application runs consistently across various environments, be it a developer’s local machine, a test server, or a production server.
Step 2. Building the Image:
If you look at the Dockerfile you will see the configuration for the DockerImage, this is where we configure the image for the application.
To build the Docker Image run the command
sudo docker build -t my-flask-app:latest .This sets up all the configurations we specified the in the Dockerfile, and creating a Docker Image we can use to deploy the application.
Step 3. Running the application
After building the image we can now deploy and run the application in a docker contianer using this command
sudo docker run -d -p 5000:5000 my-flask-app:latest
In the docker run command, the -d flag stands for “detached mode”. When you run a container in detached mode, it runs in the background of your terminal or shell session, freeing up the terminal and returning you to the command prompt.
Without the -d flag, the container would run in the foreground, and you’d see its logs and output directly in your terminal. In this mode, the terminal would be “attached” to the container’s standard input, output, and error streams.
The -p flag in the docker run command is used for port mapping or port forwarding. It maps a network port on the host (your machine or server) to a network port inside the container. The general format is -p <host_port>:<container_port>.
In the specific case of -p 5000:5000:
- 5000 (before the colon): This is the port number on the host machine.
- 5000 (after the colon): This is the port number inside the container.
This means that any network traffic that hits port 5000 on the host will be forwarded to port 5000 inside the container.
Now you should be able to access http://localhost:5000 either on your browser or using the curl command
curl http://localhost:5000
Expected output using curl:

Congratulations! You have now created your first docker application and deployed it inside a container 🙂
That’s it for this Hands-on lab, feel free to continue exploring docker. I will post another more advanced deep dive hands-on lab for docker in the future so stay tuned.
Big Love Philip 🙂

